Thursday, February 28, 2013

Bella Birthday

Happy Thursday!  I've made another birthday card...in addition to family members, I give birthday cards to many friends and co-workers, so I make many, many every year.


Today I based my card on this weeks challenge over at The Paper Players.  Jaydee created a very fun and easy sketch that one could keep CAS or "dress up" with additional details.  I tried to strike a balance in between, although for me it might be more CAS!!
 

I again reached into my supply of retired Stampin' Up designer paper to set the color combination.  This paper is from the Bella Rose collection and I've adhered it onto a panel of Pink Pirouette and then onto a base of the same card stock.


The rose from Stippled Blossoms was stamped in Pink Pirouette and Primrose Petals, the leaves in Kiwi Kiss and Old Olive, and then all were cut out and placed on a scallop circle of Primrose Petals.  

The sentiment from Curly Cute was stamped directly on the designer paper with Primrose Petals ink.


Thanks for coming by and taking a look today! 

Hugs,

Stef

All products are Stampin' Up unless otherwise noted:
Stamps:  Stippled Blossoms, Curly Cute
Paper:  Pink Pirouette, Whisper White, Primrose Petals, Bella Rose dp
Ink:  Primrose Petals, Pink Pirouette, Kiwi Kiss, Old Olive
Accessories:  White Organza ribbon, Delicate Doilies sizzlet, 2 3/8" Scallop Circle punch, Basic Pearls, Stamp-a-ma-jig 


Monday, February 25, 2013

Sweet Springtime

My card today was made for the sketch challenge at Pals Paper Arts.  I had a piece of Springtime Vintage left over from a card I made the other day and decided to make a distinctly girly and feminine card using this sketch.  Helping make that happen is the stunning lace from the Artisan Embellishments kit.  I've used it on at least three cards and stocked up on my last order, so expect to see more in the future!


Isn't that print so gorgeous?  I might be a bit biased as Baja Breeze is one of my very favorite colors.  Ever.  I continue to savor every last bit of this Springtime Vintage designer paper.

To make the flower piece, I first took a 1 1/4" circle of card stock, put super sticky tape over it and then worked a piece of Baja Breeze pleated ribbon around the edge.  Then I put glue dots on the bottom of the resin flower and popped it in the middle of the ribbon.  Finally I found a Baja Breeze button from the Twitterpatted collection and glued it on top.


The sentiment is from Sweet Essentials, which was stamped on a strip of Very Vanilla with a flag end hand snipped, and then anchored on the other end with a Silver Basic Designer button.

The layered butterflies added some balance to the overall design and of course had to be topped with some bling!  I don't use rhinestones nearly as often as pearls but I thought they would be a bright addition.


Here's the great PPA sketch:

and the link to the blog:  http://www.palspaperarts.com/

Thank you so much for looking and I hope you'll take a moment to leave a comment!

Hugs,

Stef

All products Stampin' Up unless otherwise noted:
Stamps:  Sweet Essentials
Paper:  Baja Breeze, Very Vanilla, Springtime Vintage designer paper
Ink:  Not Quite Navy
Accessories:  Baja Breeze Seam Tape and Satin Pleated ribbon, Elegant and Bitty Butterfly punches, Artisan Embellishment Kit, Silver Basic Designer Button, White Baker's twine, Basic Rhinestones.


Sunday, February 24, 2013

A Pool Party Birthday

I was playing around with the new Creped Filter Paper I bought recently and decided to pull out my Fun Flower Bigz die, Blossom punch and Stampin' Up's newest (and tiny!) scallop circle punch.  And this is what I came up with:


I love how light and airy the flower looks; I think more experimentation of flower making is called for!  


This was a simple and quick card to assemble.  The Pool Party card stock stamped with Distressed Dots and the white scalloped strip where both leftover from other projects, and I just popped out that tag from the Hearts A Flutter framelits.  I tied it onto the flower, attached everything onto a piece of Pool Party Designer Paper and done!

My card today is for Karen Giron's Sweet Sunday Sketch Challenge:


Here's the link:  (http://kgiron.blogspot.com/2013/02/sweet-sunday-sketch-challenge-178.html)

Thanks for taking a look and I hope you'll have a moment to leave a comment.  I always love hearing from you!

Hugs,

Stef

All Products by Stampin' Up unless otherwise noted:
Stamps:  Elementary Elegance, Distress Dots
Paper:  Whisper White, Pool Party card stock and designer paper
Ink:  Pool Party
Accessories:  Scallop Border punch, Scallop Circles #2, Fun Flowers Bigz die, Hearts A Flutter framelit, Blossom and Petite Scallop Circle punches, Creped Filter Paper, Antique Brad, White Baker's Twine.


Hooray for Birthdays!

A friend is having a "milestone" birthday in a week, so I wanted to make her an appropriate card.  She's not looking forward to it, but at the same time we both agreed we're always happy to be here to celebrate the next one!

That's why I call this post Hooray for Birthdays!  


Remember when you were a kid and fifty seemed impossibly old?  Well, that's the idea behind using this Graphic 45 designer paper.  50 years old?  That will be when pigs fly!!  


The Memorable Moments stamp set provided the sentiment, numbers and the dotted frame, which I hand cut so it would fit on top of a Cajun Craze piece of card stock cut out with a Labels Collection framelit.  Happy Birthday and the balloons from an old SU set, Hip Hip Hooray, were also hand cut so they could be strategically placed around the numbers.

I used Deconstructed Sketch No. 90 for my card layout.  Each week Jen Shults has a sketch challenge at http://deconstructingjen.com; this is the first time I've been able to join in the fun.

Thanks for taking a look.  Won't you leave me a comment if you have a moment?  I'd love to hear from you and how you feel about birthdays.

Hugs,

Stef

All products from Stampin' Up unless otherwise noted:
Stamps:  Memorable Moments, Hip Hip Hooray
Paper:  Basic Black, Very Vanilla, Cajun Craze, Olde Curiosity Shoppe designer paper (G45)
Ink:  Jet Black Stazon, Cajun Craze
Accessories:  Black Satin & Island Indigo Ruffle Ribbons, Labels Collection framelits, Basic Pearls, Paper Snips


Friday, February 22, 2013

Vintage Birthday Message


I'm sharing a card today made for the sketch challenge at Our Creative Corner.  I think it's a really fun sketch, with lots of possibilites.  


Here's my version:


I broke out a couple pieces of retired Springtime Vintage from my hoard, er, vast stockpile of designer paper to use for this card (okay, I love paper and ribbon...and stamps and ink...think I need to pick up my production!!)  These two designs were my favorites in the whole collection and now I'm down to my final partial sheets.

Instead of using the Top Note die for one of the side pieces peeking out from the center panel, the Oval Accent die was used to cut out a piece of Baja Breeze card stock, which was then stamped with the Distress Dots background stamp.  On the other side of the center panel, scallops were added to Not Quite Navy card stock with the Large Scallop Edgelit and then embossed with the Vintage Wallpaper embossing folder.


The second to the smallest Spellbinders Classic Oval die was used to create the focal point.  I left the die on after cutting and embossing and sponged the paper with Baja Breeze ink, leaving a nice contrasting border.  The Always Artichoke oval underneath was created with a Spellbinders Petite Scallop Oval die.  I have no idea why but these tiny sizes make me happy, they are so cute!

The sentiment, from Papertrey Ink's Mixed Messages, was stamped in Not Quite Navy, and then pearls, a flower from SU Flower Trim and tiny rose leaves from Spellbinders Rose Creations dies were added to the top.

In retrospect, I think I would have changed the flower to a butterfly, but it was late last night when I finished and I just ran out of time to play around with it.


The center panel of Very Vanilla was embossed with the Fancy Fan embossing folder.  This gorgeous Artichoke ribbon layered across the card is from a retired SU collection of ribbons, I don't recall the name of it anymore.  The Artisan Embellisment kit provided the sweet piece of lace and the metal button and then a hemp twine bow topped it off.  The final touch was Basic Pearls to decorate the four corners.
Thank you so much for dropping by today!  I'd love to hear from you if you have a moment to leave a comment. 

Happy Friday everyone!

Hugs,

Stef


All Products used are from Stampin' Up unless otherwise noted:Stamps:  Distress Dots, Mixed Messages (PTI)
Paper:  Very Vanilla, Baja Breeze, Not Quite Navy, Always Artichoke, Springtime Vintage dp
Ink:  Not Quite Navy, Baja Breeze, Crumb Cake, Soft Suede
Accessories:  Fancy Fan and Vintage Wallpaper embossing folders, Flower Trim, Basic Pearls, Artisan Embellishment Kit, Cutter Kit, Oval Accent BigZ die, Large Scallop Edgelit, Classic Oval, Petite Scallop Oval, and Rose Creations dies (Spellbinders), hemp twine (Hemptique)


Monday, February 18, 2013

From the Heart


I had need of a sympathy card for a male friend at work, so I pulled out my Serene Silhouettes stamp set.  This seemed like a perfect image.

I left the card very simple, stamping the birds in the trees and the sentiment in Jet Black Stazon ink.  The sentiment is from a retired Stampin' Up set called Holidays & Wishes.  I just love that font.  A piece of card stock punched with a scallop circle punch was randomly placed on the stamped piece and Tempting Turquoise was lightly sponged around it to give the effect of sky and clouds.


The black piece of card stock was embossed with the Stripes embossing folder and then I used my new Stampin' Trimmer to cut out the rectangle, adhering the stamped piece underneath.  While I love my guillotine-type paper cutter, the new trimmer allows you to pick up and cut within a piece of paper, which is very handy.  A silver button with black ribbon finished the card.

The Dynamic Duo challenge this week was to use Basic Black and Tempting Turquoise, with the "dessert" of adding clouds.  It was the perfect inspiration I needed to make my friend his card.

Thanks so much for dropping by!  I love hearing from you, so please take a minute to leave a comment.

Hugs,

Stef

All products from Stampin' Up unless otherwise noted:
Stamps:  Serene Silhouettes, Holidays & Wishes
Paper:  Whisper White, Tempting Turquoise, Basic Black
Ink:  Jet Black Stazon, Tempting Turquoise
Accessories:  Basic Silver Button, Black 1/8" ribbon, Stripes embossing folder, 2 3/8" Scallop Circle punch, Stampin' Trimmer.

Sunday, February 17, 2013

Thank You for Freshly Made Sketches


Do you love ribbon?  I think I have a minor obsession with really nice ribbon, although I don't always use it on my cards.  Stampin' Up came out with some lovely two-tone ribbon in their Spring Catalogue, wide, soft and easy to work with.  

I pulled out the Gray/Black combo ribbon and decided I would create my card around it today.


I used this week's sketch from Freshly Made Sketches for my card layout.  The big 1/2 circle focal area immediately gave me the idea of putting a big flower there.  Five punches out of So Saffron card stock with a Blossom punch, a couple squirts of water with my spritzer, a brad in the middle and scrunch away!


After it dried I spread out the petals a bit so you could clearly see the Antique Brad in the middle.

The base was stamped with the flourish from Everything Eleanor in Versamark and the sentiment on the tag is from Tiny Tags.  The sentiment was punched out with a 3/4" punch and popped onto the So Saffron scallop circle punch.

The strip across the card is a piece of Raspberry Ripple.  First it was put through the Big Shot with the Large Scallop Edgelit and then the ribbon was tied around it.  Then I found a remnant of white card stock already embossed and cut with the same Edgelit and thought is added a nice bit of texture and tied in the paper doily under the flower.


Speaking of which, after I made the card and went back to the FMS blog to find out the deadline to join the challenge, I realized the beautiful sample by Jennifer Timko also was gray with a paper doily.  Awwkk!!  It was not an intentional copy (really!! LOL)...plus she uses different colors and embellishments.  All I know is that I was enraptured with my new ribbon and this is what seemed perfect with the sketch.

Thanks for coming by today, I would love to hear from you if you have a moment to leave a comment.  Hope you have a great remainder of the weekend!

Hugs,

Stef

All products by Stampin' Up unless otherwise noted:
Stamps:  Everything Eleanor, Tiny Tags
Paper:  Basic Gray, Whisper White, Raspberry Ripple, So Saffron
Ink:  Raspberry Ripple, Versamark
Accessories:  Blossom, 3/4" circle, and 7/8" scallop circle punches, Antique Brad, Paper Doily, Two Tone Gray ribbon, Large Scallop Edgelit, Delicate Designs embossing folder, White Baker's twine.

Friday, February 15, 2013

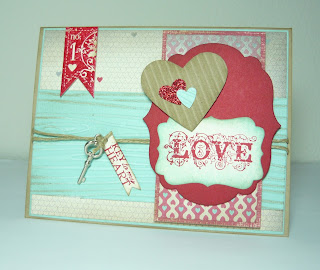
No. 1 Valentine


Hi there friends, hope you're having a wonderful day.  I took a vacation day today to make this a long weekend, and it has been glorious weather here, clear skies and sunny, plus a bit warmer than usual.  Makes one look forward to spring.  Of course, it's supposed to start raining again tomorrow...ah, the glory of Western Oregon in Winter!


Today's card is the Valentine I made for my husband, Kevin, naturally my No. 1 Valentine!


I stamped the flag from Affection Collection in Craft Real Red, heat embossed it with clear embossing powder, and then snipped it out right up to the edge of the image.


A Labels Collection framelit cut out the Real Red focal point, upon which I applied the Love sentiment from Affection Collection and the hearts.  The Crumb Cake heart was punched out using the Large Heart punch and then run through my crimper. 

The tag was cut out with the smallest Bitty Banner framelit after I stamped the sentiment from You're A Gem on Very Vanilla card stock.  It was a tight fit but I used some light stick tape to hold it in place while I ran it through my Big Shot.  I snipped off one of the flagged ends so I could attach it to the Hemp Twine.  I really love twine for masculine cards and was sad when Stampin' Up decided to quit offering it, however I recently found it available in their Sale Rack and added a couple packages to my stash.  I also got the trinket key from there at a much more reasonable price than they originally offered them.

I used Crumb Cake to sponge around everything, with a bit of Pool Party around the Decorative Label punch with the Love sentiment.


Well, that's it, a pretty easy and straightforward creation.

Thank you for dropping by today, I would love to hear from you if you have a moment to leave me a comment!

Hugs,

Stef


Thursday, February 14, 2013

Papillon and Primrose


I am thoroughly honored to be the focus of a brief spotlight today at the Our Creative Corner Top Talent Thursday.  The incredibly wonderful crew at OCC picked my card (posted a couple posts back) as their weekly winning entry in January and then asked that I do a small interview for the post today.  Please head over and check out the wonderful Our Creative Corner challenge blog and the Q&A (http://ourcreativecorner6.blogspot.com/).


As part of this process I was asked to make a new project for the post today.  The card I chose to make has many of the elements I love...lace, flowers, a fun embellishment, and the Primrose Petals Coordinations paper I can't seem to get enough of!

I started off with Early Espresso card stock, tore and sanded a couple of strips of the Coordinations paper, then pulled out my long neglected Natural Composition dp, which comes with various designs already embossed on the card stock.  I decided on the sheet music image.

Crystal Effects was used to glue the flattened Soda Pop Top and paper flowers on the flagged strip.  The image in the middle of the pop top is from Collage Curio, a new stamp set with lots of great vintage images.  I adhered the piece of lace under the embellished strip, which has a Finishing Touches Edgelit in Early Espresso that decorates along the bottom.  This is definitely a card to be hand delivered.


The left hand corner was looking a bit bare so I punched out a butterfly and put in the center of it a colored rhinestone that I pried out of a Fire Circle brad.  I thought the yellow color of the rhinestone added a fun and unexpected element.

Thank you for taking a look today, and I would love to hear from you if you have a moment to leave me a comment!  And please go scroll through the blog at Our Creative Corner.  These women are crazy talented and you'll love what they do on a weekly basis!

Hugs,

Stef

All products from Stampin' Up:
Stamps:  Fabulous Phrases, Collage Curio
Paper:  Early Espresso, Primrose Petals Coordinations, Natural Composition dp, Morning Mocha dp
Ink:  Early Espresso, Primrose Petals, Crumb Cake
Accessories:  Soda Pop top, 1" Circle and Elegant Butterfly punches, Fire Rhinestone brad, Artisan Embellishments kit (lace, paper roses), Finishing Touches Edgelit.

Sunday, February 10, 2013

FMS72 Amazing Birthday


I made this card for my birthday card stash.  Between family and co-workers, I am always in need of a masculine birthday card.

Freshly Made Sketches (http://freshlymadesketches.blogspot.com/) provided the card layout.  They have weekly sketches that I usually find to be fantastic, although I don't always have time to play along.  One of the challenge criteria is that your card must be "clean", as in no distressing and probably not much sponging either.

CAS is hard for me for some reason, I just want to keep adding more "stuff"; ribbon, embellishments, layers, sponging, etc. so it is truly a challenge for me.  Today's card is about as simple as it gets, but I really enjoyed it because it came together so quickly.  See what you think:


The designer paper is from Print Poetry from the Stampin' Up Spring Mini.  Many people, including me, find the Summer Starfruit difficult to warm up to, however, I think it plays well in this color combination.

Markers were used to color both the balloon image and the sentiment.  The Hounds tooth embossing folder adds some texture on the Midnight Muse strip.  I cut out the balloon image and popped it up on the Summer Starfruit circle.

Thank you for dropping by today!  I hope you'll find a moment to leave me a comment, I'd love to hear what you think!

Hugs,

Stef

Products used are all Stampin' Up:
Stamps:  You're Amazing
Paper:  Midnight Muse, Summer Starfruit, Very Vanilla, Print Poetry dp
Ink:  Midnight Muse, Crumb Cake, Summer Starfruit (all markers)
Accessories:  Hounds tooth embossing folder, Summer Starfruit Stitched Satin ribbon, 1 3/4" Circle punch, Corner Rounder punch, Paper Snips


Tuesday, February 5, 2013

Vintage Birthday

 
My girlfriend at work had a birthday on Sunday and I wanted to make a special card for her, because she is the reason I began making cards!  Gotta love her for that and, more importantly, she is a sweet person.
 
Recently I ordered a wonderful stamp set from WPlus9 called Very Vintage Greetings.  It has the beautiful stamped frame you see below plus lots of pretty sentiments.  A matching die cut it out perfectly.
 
The Flower Trim from Stampin' Ups Spring Mini was "interesting" to color.  A lot of blogs are showing how you use a sponge dauber to either press the flowers into the stamp pad or apply the ink with the dauber, then spritz with water or rubbing alcohol and let it dry.  The ink spreads to the other lesser or uninked parts of the flower.  Well, my first try was with Pink Pirouette ink and I don't know what happened but when it dried it was more of a light coral color; uh, not quite in the color theme for this card!  So I tried it with Bravo Burgundy.  Got a bit carried away with the ink and when they dried they looked black.  Yikes.  I finally got the right amount of ink and they turned out great.


The layout was from a sketch at Seize The Birthday challenge blog.  You can find it here http://seizethebirthday.blogspot.com/

I'd love to hear from you, so please take time to leave a comment.  Thanks for looking!

Hugs,

Stef

Products used Stampin' Up unless otherwise noted:
Stamps:  Very Vintage Greetings (WPlus9)
Paper:  Bravo Burgandy, Very Vanilla, Parisian Breeze dp
Ink:  Bravo Burgandy
Accessories:  Flower Trim, Small Heart punch, Itty Bitty Button, Linen Thread, Die from WPlus9, Basic Pearls, Lace (Joann) 


Sunday, February 3, 2013

Our Creative Corner Winner!

Back on January 12th, Our Creative Corner's weekly challenge was to create a Shabby Chic style card.  Not always my strong suit but a style I love, I decided to create a card with some of the new Artisan Embellishments and lovely, soft Flower Trim that Stampin' Up had in their new Spring catalogue. 

Unbelievably, they chose my card as their top choice!!  OMG!!  I was so shocked, excited and very honored.  It had to be all the beautiful goodies I lavished on the card.  Check it out:


I used the new More Amore dp and the Coordinations card stock with my favorite Lacy Brocade embossing folder, which I sanded to show the lighter interior color of the paper.  The Flower Trim went on top of the Very Vanilla seam tape ribbon. 

My favorite part is of this card is the lace-the gorgeous cream lace was layered under the hearts  and the incredibly lightweight Primrose Petals lace that edges the bottom of the Primrose card stock.

Our Creative Corner always follows up their Top Talent choice with a small Q&A and another, different creation.  I'll be posting mine on Valentine's Day, so check out their blog (http://ourcreativecorner6.blogspot.com/)  and my post here on my blog.

Thanks for taking a look today!  I would love to hear from you so please leave a comment if you have a minute.

Hugs,

Stef


Saturday, February 2, 2013

Day One

My first blog.  My first post.  Don't know what the heck I'm doing, so it will be learning on the fly.  I hope you'll bear with me as I learn!

The main purpose for creating this blog is to share my love of paper crafting and hopefully you'll enjoy what you see here.  I've thought about starting a blog for a couple of years, but was always a bit nervous since I am one of the least "techie" people around!  But here we are so I guess I will show you a card a made today for my 10-year old grandson.


I used the popular chalkboard technique for the main image, first stamping with Craft White ink, then using white embossing powder to pop the image.  Then I lightly sponged white craft ink around the images to get the chalkboard look.  I dug out my old Prismacolor white colored pencil to draw the boarder.  The flag was also heat embossed with white embossing powder on Real Red card stock. 

The soda pop top was flattened in my Big Shot (scary moment, but it worked just fine) and I added the punched sentiment.  Negative space was created with my Heart to Heart punch to show the red cardstock underneath.

The rick rack is recycled from a Christmas gift, and the background piece of Pool Party was run through the Big Shot with the Woodgrain embossing folder.

Well, now I guess I better let friends and family know I started this new venture and hope people will pop by periodically to see what's up!  Thanks for stopping by!

Hugs,

Stef


Products used by Stampin' Up unless otherwise noted:
Stamps:  Affection Collection, Hearts A Flutter, P.S. I Love You
Paper:  Pool Party card stock and Coordinations cs, Basic Black, Real Red, Whisper White
Ink:  Craft White and Real Red, Versamark
Accessories:  Soda Pop Top, 1" Circle and Heart to Heart punches, Hearts A Flutter and Hearts Collection framelits, Woodgrain ef, misc. rick rack, hemp twine (Hemptique)